
This is the second part of two-part posts where I’m going to detail all the steps to build a complete Q&A chatbot. Thanks to Xenioo built-in NLP and Database features you’ll see how it is possible to realize such a powerful and smart chatbot without writing a single line of code.
The Let’s Build posts series aims to show how a complete chatbot can be built using all of the available Xenioo features with the highest possible detail. By the end of each post, you will gain insight into basic and advanced Xenioo functionalities and be ready to try more complex approaches. All of the additional material used for these posts and the complete chatbot are made available here for download or inside the Xenioo templates section.
- Let’s recap your Q&A chatbot
- Building your Body Parts Database
- Training Entities from your Q&A Chatbot Database
- Building your Exercises Database
- Showing Exercises on your Q&A Chatbot
- Hand Over the Conversation to a Gym Trainer
- Connecting your Users with Trainers
- Collect Feedback from your Q&A Chatbot
- Analyzing Feedbacks of your Q&A Chatbot
- Wrapping Up
Let’s recap your Q&A chatbot
In our previous post, we completed the build of the first part of our Awesome Gym chatbot. Our chatbot is now capable of reply to general user questions about the Gym that are read in real-time from Xenioo Database.
In this second part, we’re going to add more features and tweak our account so that our customers can freely manage all the data and the conversations without accessing our flow design.
What we are going learn in this post is how to let our users:
- Search specific body parts exercises
- Ask a personal trainer for real-time assistance
- Leave feedback on our chatbot service and collect statistical data
- Configure Xenioo so that our customers can access conversations and data, but not other sections of the chatbot.
Ready? Good…Let’s start! 🚀
Building your Body Parts Database
Our previous post created an entity called ‘bodypart’ with all the body parts we knew. The entity, trained like that, was used in our Exercises intent to detect expressions like:
- What are the best exercises for pecs?
- How can I improve my biceps?
Our training worked great but we could still push it a little further. If we think about it, more often than not, customers have a clear idea of all of the possible terms that may be used referring to their products while we, the designers, may guess just a few.
What if we could somehow let our customers train our body entity without giving access to Xenioo AI? Let’s see how the database section can help again here.
First of all, let’s head back to the Database section of our chatbot to create a new collection as we’ve seen in our previous post. We’ll call it bodyparts and again, for now, it won’t be accessed using API.

Our new collection will need a field for our main part name (e.g. pectorals) and a field for all the synonyms we wish to use (e.g. pecs). We will add these fields to our Collection Fields list.
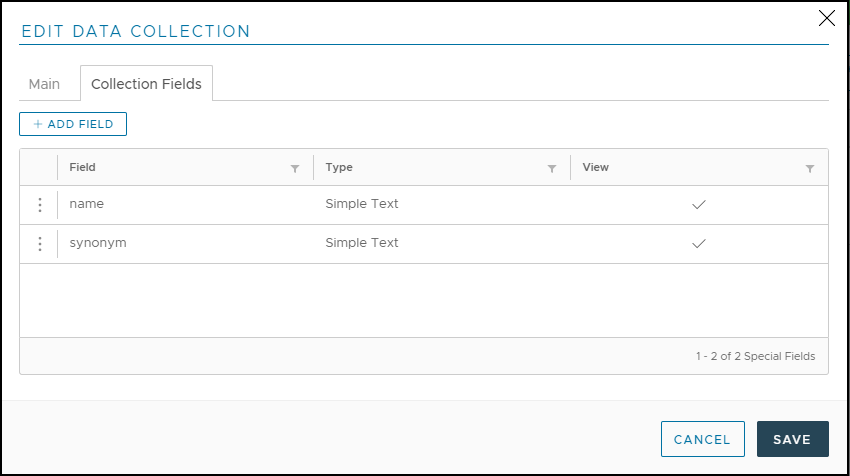
Once saved, our collection is ready to be used.
This time, let’s assume our customer gave us a typical Excel file with all of the data collected. This is usually a step where we need to find a way to quickly import our data into our database. Luckily for us, Xenioo Database supports CSV import right out of the box!
For our example, we’ve prepared a very simple Excel file that looks like this:
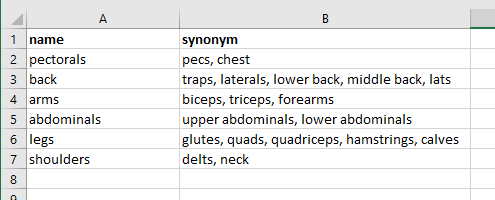
All we need to do, in order to import this data into Xenioo is make sure that the headers of each column correspond to the field we want to fill. Besides this, once saved as CSV file, we can click on the “Import Data” button and upload it directly to Xenioo.
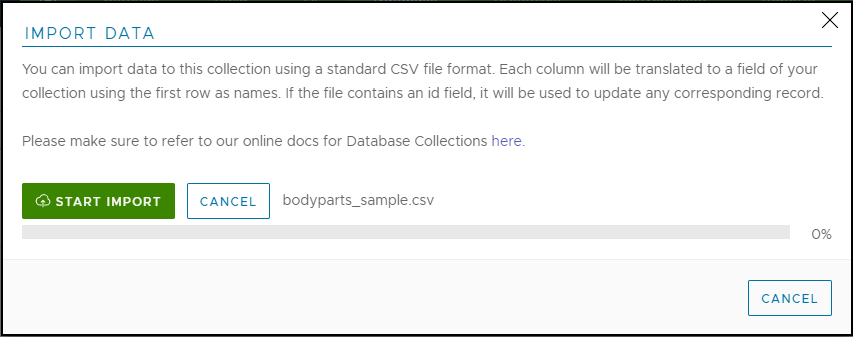
Import happens immediately and as soon as Xenioo has finished parsing the source file we will be able to see our data in the collection view.
Training Entities from your Q&A Chatbot Database
Now that our data is ready and completed, we can move back to the AI section of our bot and change the way our entity is trained.
If you remember, in our previous post, we created our entity by manually configuring both names and synonyms. This is still something we can do and that works very well, but now we want to give our customer a form to handle that data and have Xenioo training reflect every change.
To connect our Collection Data to our entity we just need to go to the entities list, under the AI section of our chatbot, and double click on the entity we wish to change.
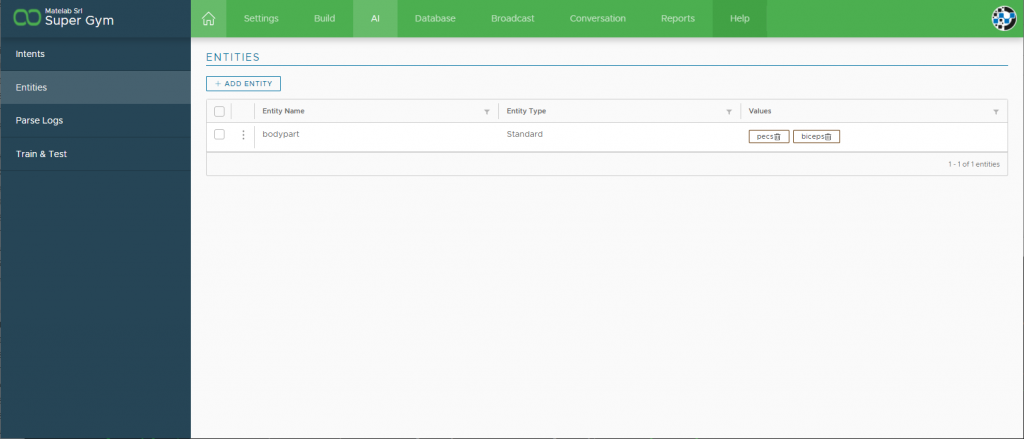
From our entity detail, we can then change the type from “Standard” to “Collection”. See how we can now select a specific collection as a source for our entity? Let’s pick the bodyparts collection. All we need to do now is let Xenioo know which field we wish to use for our value and which for our synonyms.
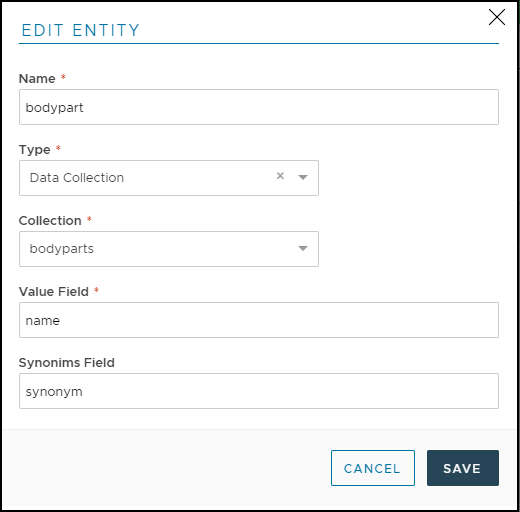
That’s it. Now, every time we edit, remove or add a new record in the bodyparts collection, Xenioo will mark our AI model for training.
Our customers can now maintain a dynamic part of our chatbot AI without even accessing it.
Building your Exercises Database
Now that our body parts entities are set we can move to our next topic: creating a comprehensive list of exercises that our users can browse.
Again, the basic idea here is to have a collection of data with a column that would be referencing our entity value. Using this approach, we can later use the entity searched by our user to query our exercise database and display all the data.
This is the list of fields we’re going to use for our exercises database:
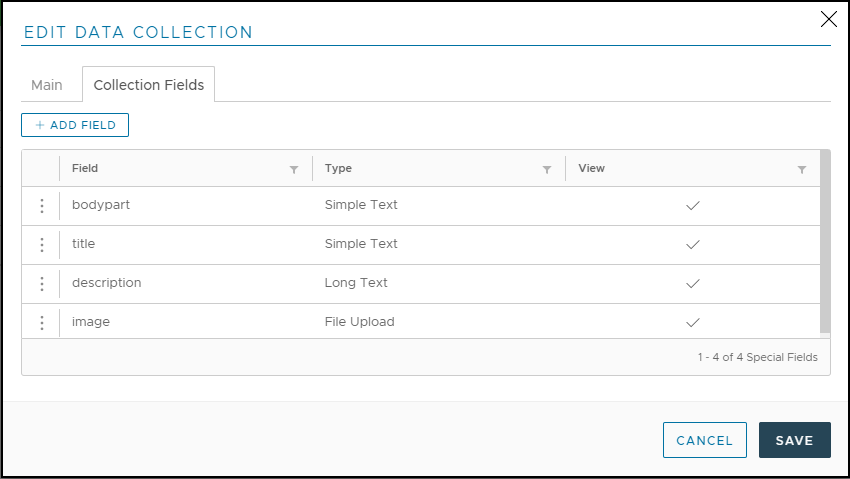
Nothing special except for the last field which is particularly interesting. As you can see, the image field is of type “upload” and does exactly what you may think it does: allows our users to upload a file directly to the Xenioo storage!
This way, our customers will be able to add new exercises to the database and upload an explanatory image directly from the database interface without accessing our chatbot flow!
Moreover, since we do not want our database to be bloated by excessive attachments, Xenioo will gracefully handle these files by uploading them to your Xenioo storage, while storing a simple, short, reference inside the actual model.
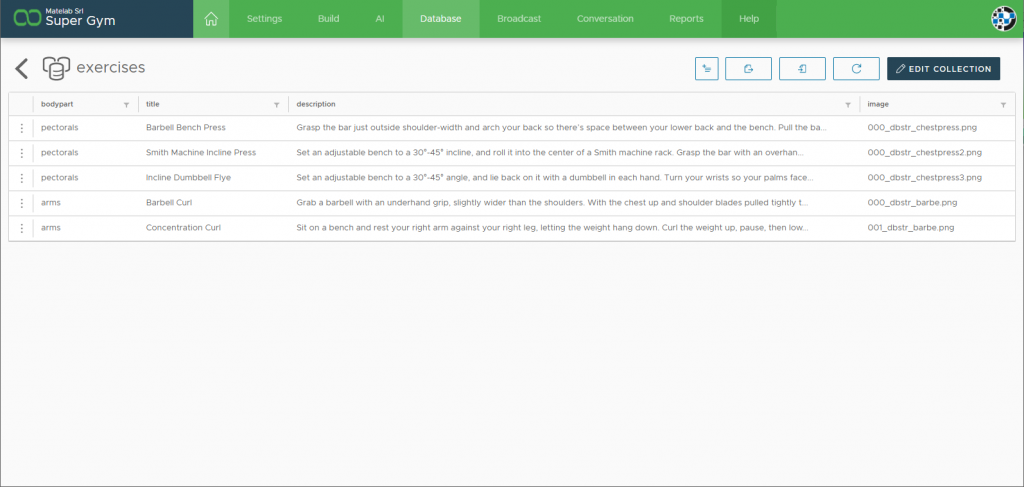
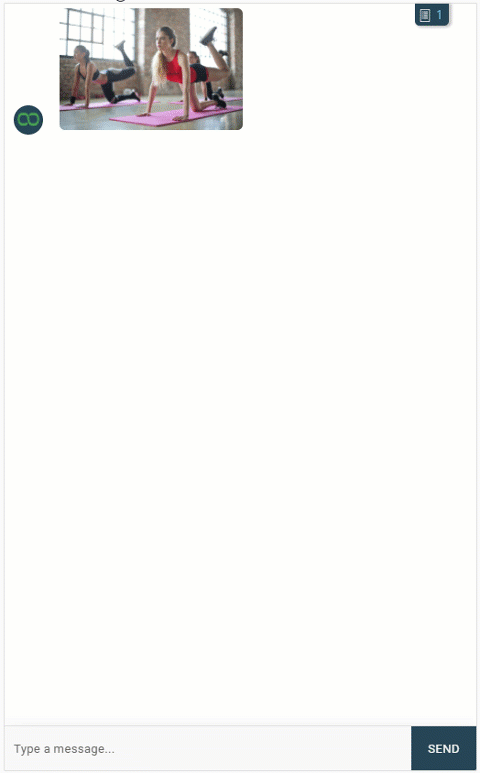
For our example, we go ahead and create some example exercises. Each exercise has its own title, description and image.
Showing Exercises on your Q&A Chatbot
Now that our exercise database is ready, we can move back to the building part of our chatbot to create a flow that will display our search results.
Our previous post trained a general exercise search intent with some expressions that our users may use. Remember? We also trained the entities we just connected to our bodyparts collection.

Let’s head back to training & testing to see what our training intent results are. Let’s type something like “what are the best exercises for pecs?”.
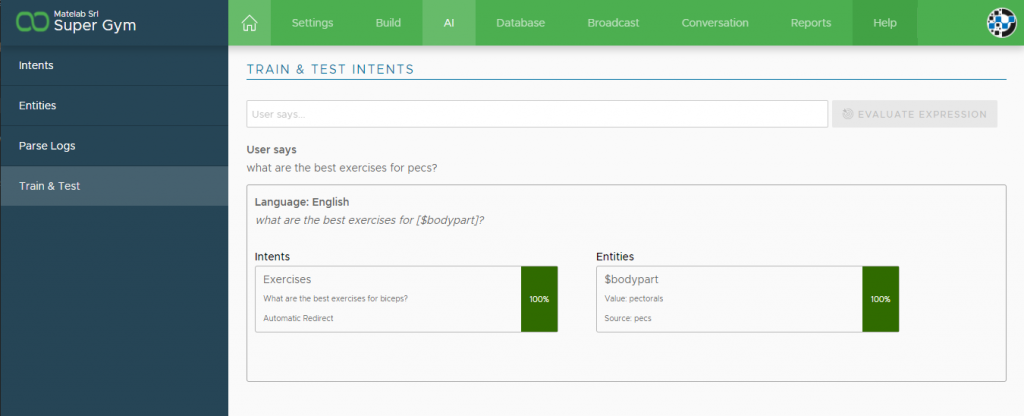
This is exactly what we wanted: our entity is detected and we can use it as a variable to later query our exercise database. Let’s move to the Build section to create our flow.
The first thing that we need is a Database Query Action to query our exercises collection. Since our users will ask for a specific body part, we will add that as a filter.
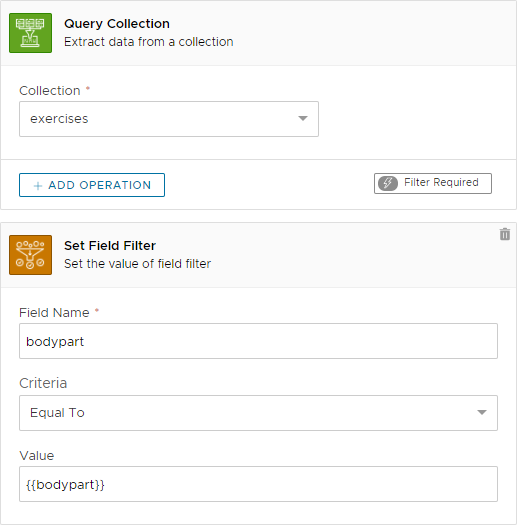
Similar to what we did with our questions collection, what we’re doing here is filtering our Query using the value of the {{bodypart}} entity to filter on the bodypart field. What we want is that our exercises table gets filtered by the body part requested by our user.
But from where the {{bodypart}} parameter comes from? Remember how we just tested our Xenioo AI against a simple exercise question? As the expression is detected, every entity is automatically transformed into a Xenioo variable and can be used inside any action parameter. Dynamic parsing is one of the most powerful features of Xenioo.
Now that our exercise query is set up, we need some way of displaying the data contained in our results. Since we may have multiple exercises that can be related to the body part the user has searched, we could use a carousel to show them all.
We have multiple options here as we could set up a dynamic carousel using the query model or use scripting to create some totally new content dynamically. Since we want to keep our example fully no-code, we’ll be using the very best option: the Xenioo Database Carousel Action.
Let’s add it right after our Database Query and fill it with our data pointers:
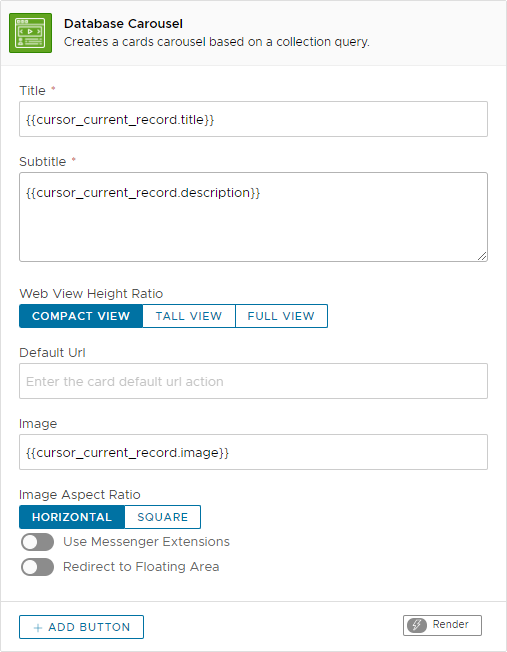
What did we do there? title, description, and image are our exercise collection fields. We’re telling our action that it should take the values from the current query cursor and use them to fill the carousel parameters.
The Database Carousel Action will automatically loop on every record returned by the query and build a complete carousel for us.
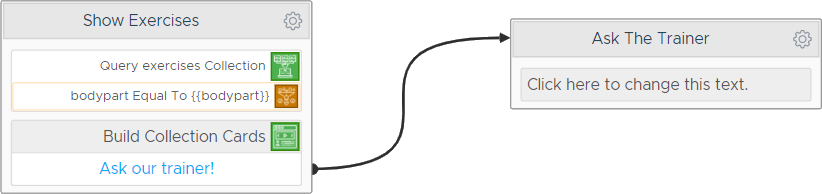
But it wouldn’t be a carousel without at least one button. Since in our example we would like to give our users the option to talk to a trainer, we will be adding an “Ask Our Trainer” button to the action.
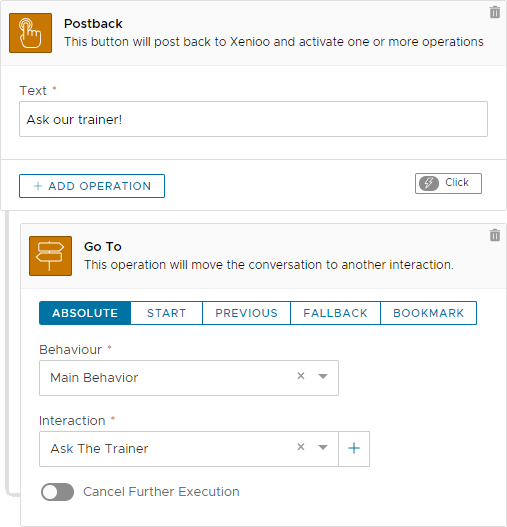
This is how our exercises flow will look after this change:
Time to try our chatbot. Let’s hit the preview button and see how it behaves:
Awesome right? We just built a chatbot capable of replying to questions, extracting information from them, and generate dynamic content that our customers can manage autonomously in an easy and streamlined form interface, without writing a single line of code!
If you know any other tool that let you build something like this, well, we’re all ears 😉
Hand Over the Conversation to a Gym Trainer
The next step in our flow is now to let user talk to our gym trainers.
As you may know, Xenioo supports teams and groups of operators that can manage support and conversations for one or more chatbots. All team members can benefit from a fine-grained permissions scheme and can work on multiple bots even from different accounts.
Team handling has been deeply discussed in previous articles so for our example we will be going in a slightly different direction, which is often the case in situations where we’ve multiple professionals who aren’t always connected to Xenioo for support.
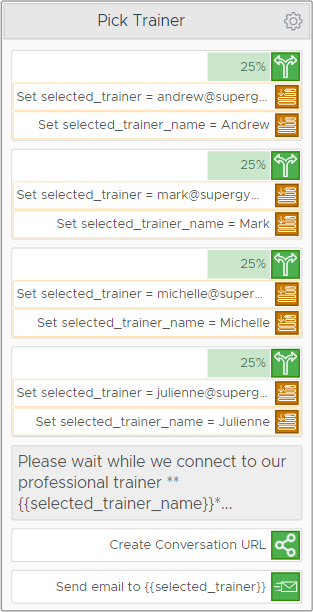
We imagine our gym having 4 professional trainers. All our trainers can be addressed by our users and Xenioo will pick them randomly. Our professional trainers are not Xenioo users but they will still need to talk to our users, whatever the source platform they may use.
Our fantasy personal trainers are: Andrew, Mark, Michelle and Julienne.
Let’s see how we can build a flow that accomplish all the above.
First of all, when the user wants to contact a trainer, we need to pick one randomly. To do so, we can use a very handy Xenioo Action called Random Split. What this action does is firing a trigger if a specific chance threshold is hit.
Let’s have a look a this example:
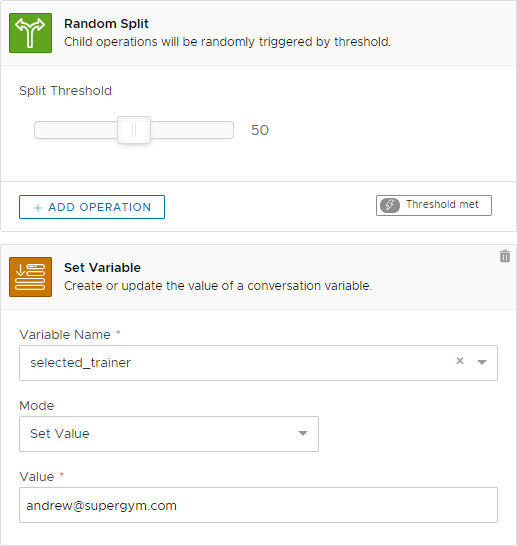
What is happening here can be basically translated to: randomly execute any operation attached 50% of the time (so about 50 times every 100).
The action above is extremely useful when we need to create some kind of randomness (like when doing A/B testing, as an example) in our chatbot and in our example becomes extremely handy for selecting our trainers.
Let’s look at our final flow we are using to select our trainer:
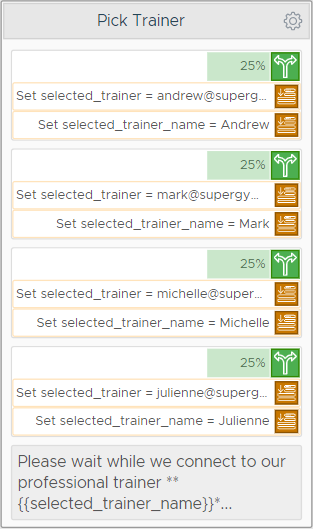
As we have four trainers, we are building four Random Split actions with a 25% chance each. As a result, each time Xenioo will randomly pick one of the four trainers and use it.
We do not need to balance perfectly each Random Split: we could have some trainer with a 50% chance and some others with just 10%. Random Split chances are incredibly flexible.
Now that our flow is picking our professional trainer, we need to send an alert and initiate a chat with our users. How can we do this?
To send an alert we have multiple options: we can go from a standard mail message to an SMS to a Slack notification or even a custom API call. For our example, we will use a standard mail message as it doesn’t need any extra service as it is already built-in into Xenioo integrations.
Connecting your Users with Trainers
To connect our user to our trainer we will use one of the most interesting features of Xenioo: conversation sharing. Sharing a conversation means creating a unique web link that points to that conversation.
Clicking that link will open a conversation interface that will allow anyone to talk to our user.
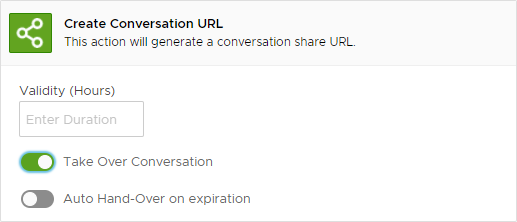
We will add this action right before the email so that we will be able to use the link generated and send it in the body to our selected trainer.
Since we want to make sure that the conversation is quickly taken over, we will set validity of just 1 hour. Once the validity expires, Xenioo will automatically close the share.
Of course, we could choose to add all of our trainers as team members to our bot and have them overwatch the conversation section to reply to whoever needs help. Since in a gym, trainers tend to be hanging around helping users on the spot we preferred something different. Something that let our support group be away from computers and still be reachable.
Here is how our complete flow looks inside Xenioo builder:
This part is complete too and we’re now ready to try it live. Let’s publish our bot online and see how it looks on a web page.

As our user clicks on the button a mail is sent to our trainer with a share url. Our trainer can click on the link, even from the simplest mobile phone, and talk to our user directly:
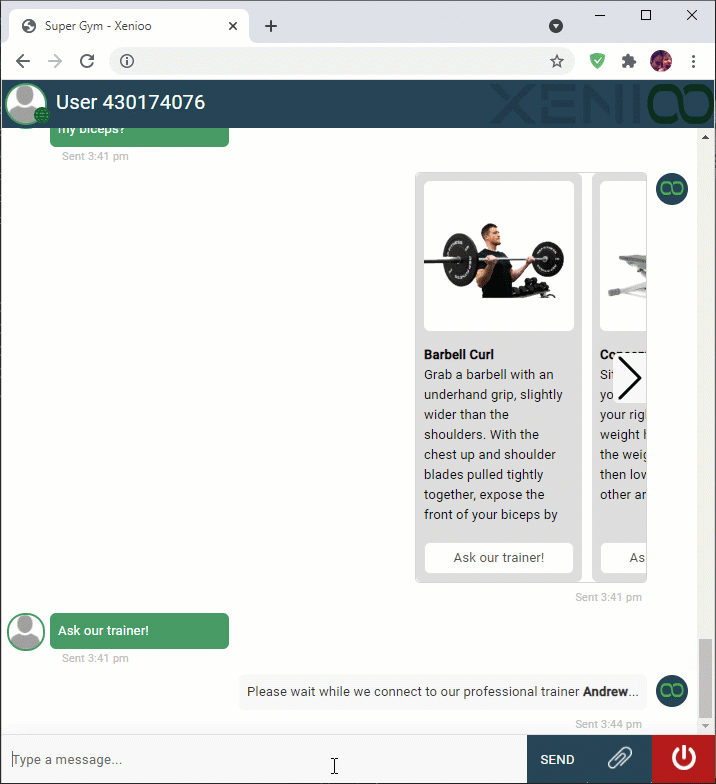
Remember: the shared URL interface works for every channel!
Your user could be talking from Whatsapp, Facebook, or Instagram and your trainer would still be able to chat perfectly fine. As an added bonus, since privacy and information sharing is a (rightfully so) important topic these days, no contact is shared between the two-party: your trainer does not need to know the phone number or the Facebook handle of your user and vice-versa.
Collect Feedback from your Q&A Chatbot
Feedback from your customers is one of the most important things you should be collecting and analyzing. Knowing what your users think of your services and of your personnel is key to continuous improvement.
In our Super Gym example, we want to collect users feedback about our services with a very simple survey: how did our trainer do?
First of all, we need to set up our data once again. We need a collection that can handle all of the feedback that our users will send us. We will name our new collection Feedbacks.
This time we will enable API access: we will use it later for our data analysis.
Here are the fields we’ll be using for our feedback collection:
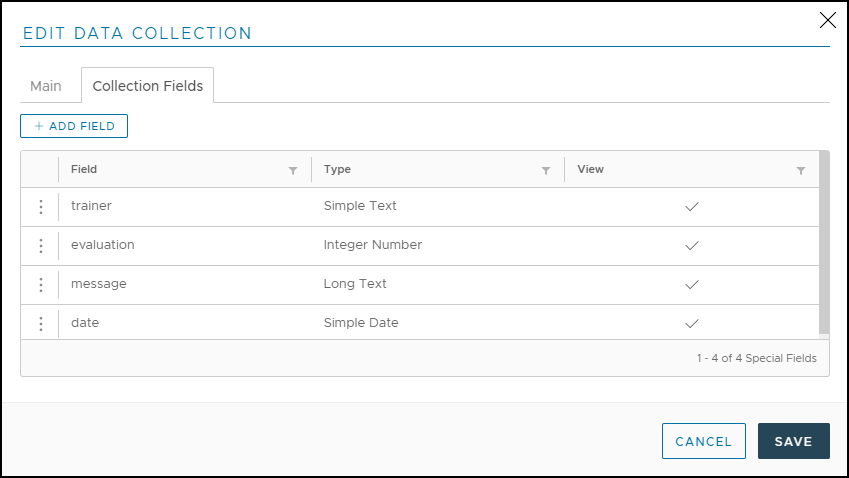
As you may know very well by now, we didn’t really need to define our fields as we’ll be updating this collection from the flow but it could be useful now and then to have a form available for fine-tuned edits.
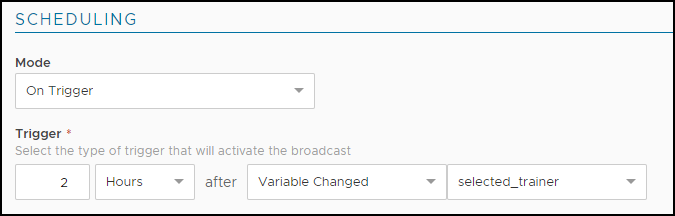
Now that our collection is ready, we can set up a broadcast that can be triggered a couple of hours after our user asks to talk to the trainer. This will give our users time to evaluate the chat that just happened and leave a score and a comment.
To build our broadcast, let’s move to the Broadcast section of our chatbot and click on the “Create New Broadcast” button. Let’s call the broadcast “Feedback Collector”.
We can leave all broadcast options as they are for now except for the scheduling part: we need to set up an On Trigger broadcast. The On Trigger broadcast is executed whenever a specific condition is met for a specific conversation.
In our case, the trigger will be set to two hours after the selected_trainer variable is set. The selected_trainer variable is set when the user asks for a trainer, so it comes in handy here too for our trigger.
Here is how the Scheduling section of our broadcast looks when configured:
Once the scheduling is done, let’s move to the flow section of our broadcast.
As we contact our users again, we should first ask permission to continue with our questionnaire. If the user doesn’t want to give us feedback we’ll just leave it there.
If the user instead chooses to give us feedback, our flow will redirect to another interaction, asking first for a score and then for a free text message. Our flow will look similar to this:
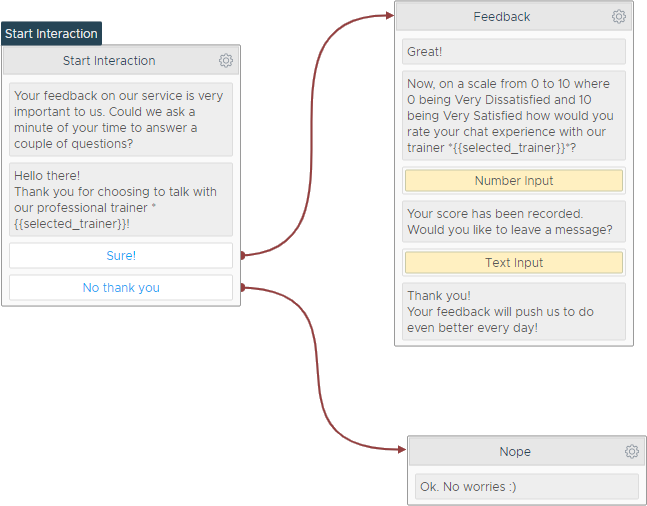
Nothing we haven’t seen already in all our chatbots 🙂 The true difference here is what we’re going to add after the chatbot final message after the user replied to both our questions: we’ll save our variables to our feedback collection.
To save our variables, we’ll be using a Database Save Record Action. This action will store a new record inside a given collection with all the fields we wish to specify. Here is how our feedback saves could look like:
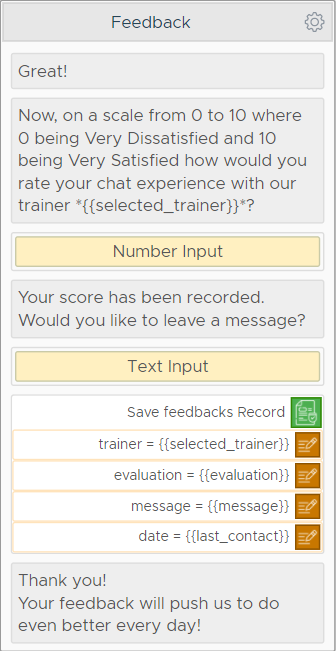
See what we did there? Once again, using Xenioo dynamic parsing we’re setting our collection fields using our direct values from the current conversation. Let’s see what happens for our user:
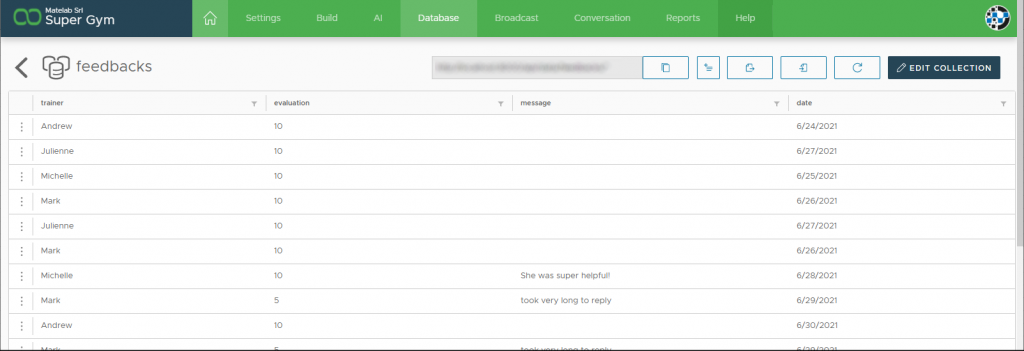
Analyzing Feedbacks of your Q&A Chatbot
As our gym works, our feedback starts coming in. Our feedback collection is filling up quickly and nicely.
The last thing we’re missing now is a way to analyze this data. What if we could do that using a standard web connection, without exporting the data every time and importing it into an Excel sheet or into some other tool? Once again, it’s time for Xenioo Database to shine!
Xenioo Database collections that can be reached by API can also be reached as a standard Web Data Source that can be integrated into most modern data analysis tools.
For our example, we’ll be using Microsoft Excel.
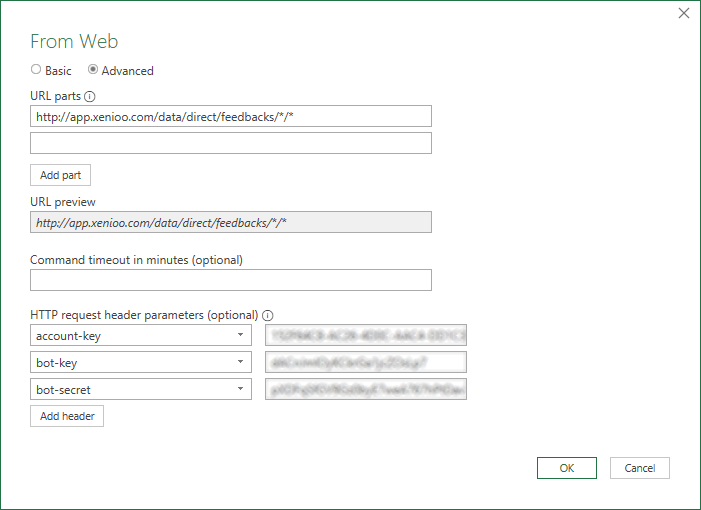
We need to create a brand new Workbook, click on the Data ribbon tab, and then click on the Get Data button. We must choose “From Other Sources” and then “From Web” from the data dropdown.
From the Excel Web Data interface, we can click on “Advanced” to see all fields. On the URL parts, we can copy/paste the feedbacks collection endpoint and change it slightly to become something like this:
http://app.xenioo.com/data/direct/feedbacks/*/*On the bottom of the dialog we must input some of the API Keys related to our account and bot.
These parameters will be used by Xenioo to attach to a very specific chatbot and collection. Once configured, our Web Data interface will look similar to this:
Just remember that your account may be on a different Xenioo node. Instead of app it could be app02 or app03 etc. so make sure you’re using the correct address.
When everything looks fine, click on the Ok button to get an immediate preview of your data, extracted on the fly from the Xenioo Database.
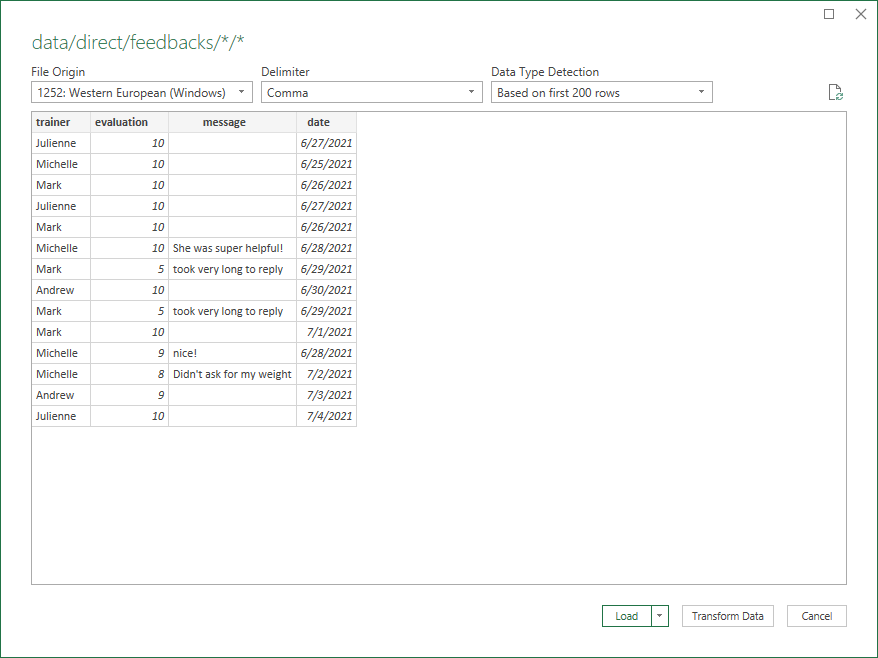
If everything looks fine, just click the Load button to insert a reference to the data into the current Excel Sheet.
And this is it!
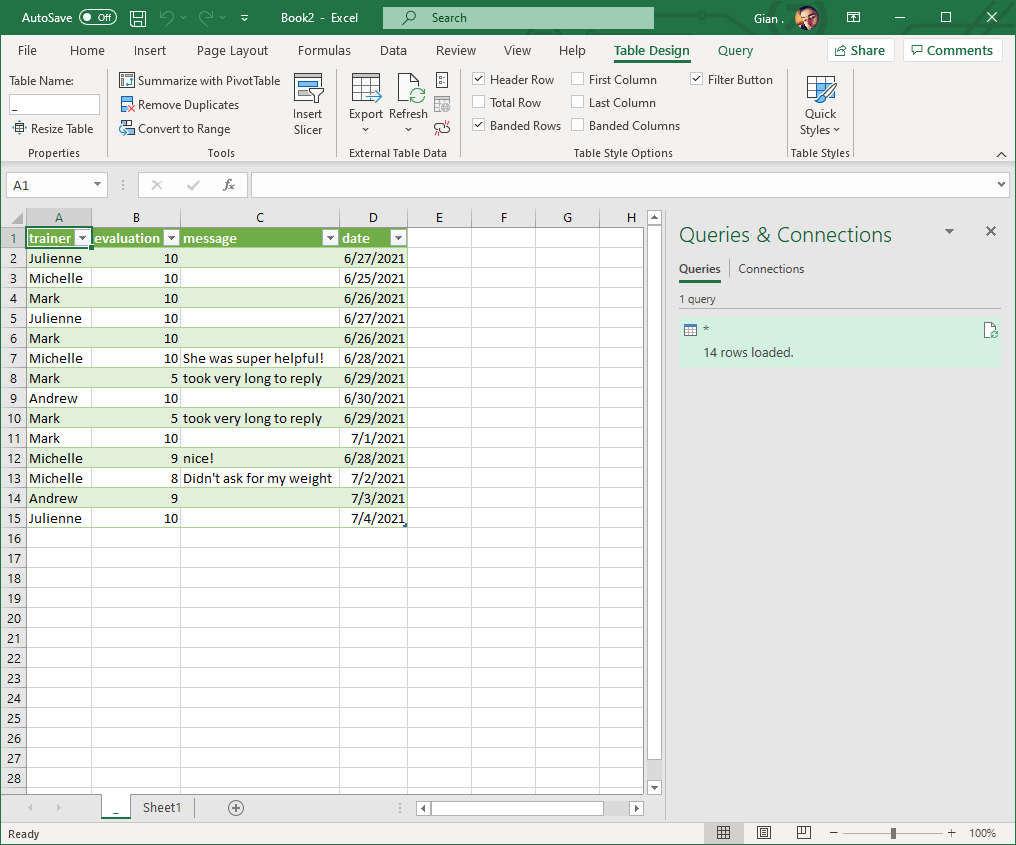
No more export and import but just immediate and always up to date data connections.
That’s right: this is not a one-time export: Excel will keep the connection referenced! From now on, all you need to do is open this Excel file and click on the Refresh button to update the data and download any additional records that have been added!
We’ve completed our chatbot will a heap of advanced features that would usually require days of front-end, back-end, and database coding without writing a single line of code!
What’s left? Hrm…Let’s see who’s the best trainer of our Super Gym with a simple Excel Chart!

Well, congratulations Mark and Michelle! Keep up the good work! 😂😂
Wrapping Up
Wow! This chatbot has surely been a ride to build and design!
Any question about the features explained in this post? Do you want to let us help on your awesome bot idea? Be sure to get in touch with the Xenioo team at team@xenioo.com or leave a message on our Facebook Group.