Welcome to our first Xenioo tutorial. The purpose of this small lesson is to help you better understand Xenioo’s inner workings, and guide you to create your awesome chatbot.
Today we are going to take our very first steps, and following this lesson, you’ll be able to create your first chatbot with some standard chat text and buttons.
A very simple chat flow to introduce you to the very basics.
You can follow our lesson directly from the video below. At the end of the post, you will find a Xenioo bot file that simply restores the example bot into your account for playback and testing. Let’s start!
Creating a Chatbot
Right after login, you’ll be in your account dashboard.
It’s a little empty so we can start by creating our first chatbot. Just click on the Add New Chatbot button to create a brand new chatbot.

Xenioo chatbots are organized in three simple concepts: Behaviours, Interactions
From the bottom going up, an Action is a specific element like a text or a button. Everything is performed by either the user or the chatbot.
Multiple actions are grouped into a single Interaction.
Multiple interactions define specific bot Behaviour.
For example, a Behaviour may be a “Support And Feedback”, an interaction may be “Ask about a problem” and may contain actions like “Ask for input”, “Evaluate Input” and any flow decisions.
Using standard Text Actions
Our very first chatbot already contains a behaviour called ‘New Behaviour’ with a single interaction called ‘Bot Interaction’.
Our interaction contains a single action: a Text Action. This is one of the simplest actions you can add to your chatbot and represents a simple chat text bubble.
Although very simple, this is already a working chatbot and can already be previewed. You can activate the preview panel on the right side of the window and click on the “Refresh Preview” button to see your chatbot in action.
Remember: anything you do in the designer window can be immediately tested thorugh the preview panel.
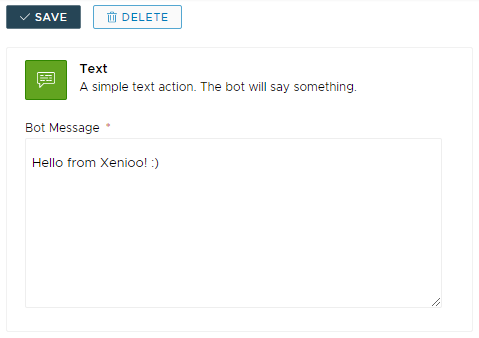
Now click on the interaction text: the panel on the right will switch to the action properties section. Go ahead and change the text to whatever you like. Once you’re done, click on the Save button to apply your changes.
If you get back to the preview panel, you can test your update right away.
Xenioo employs a draft/publish approach to every chatbot as a whole.
Feel free to change
Creating a simple flow
A typical example of a standard chatbot flow is to present one or more buttons that can move the conversation to other interactions.
What we want to do now is create a simple button that once clicked will move the user to another interaction.
First of all we need to create a new Interaction that will be our next step in the chat flow. To do so, we can click on any free spot of the designer area: this will show the current behavior details in the properties panel.
On the panel, we can click on the ‘Add Interaction’ button. A new interaction will appear in the designer. Let’s click on the new Interaction and change the default Text Action text.
Each new Interaction will contain a Text Action by default. You can easily delete it if you wish to build it differently.
Now that we’ve created a new Interaction, we want to connect the first one to this one with a simple quick button. To do so, let’s click on the interaction header: the interaction property panel will display the interaction data.
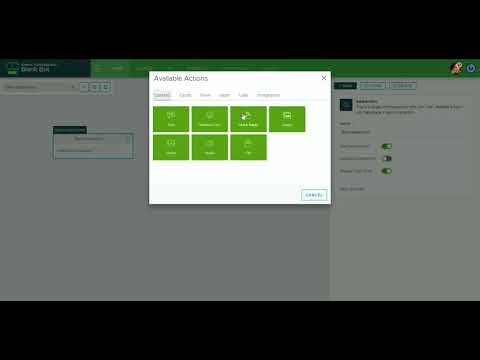
Click on the “Add Action” button to display the available actions dialog. This dialog will display all the actions that can be added to the current interaction.
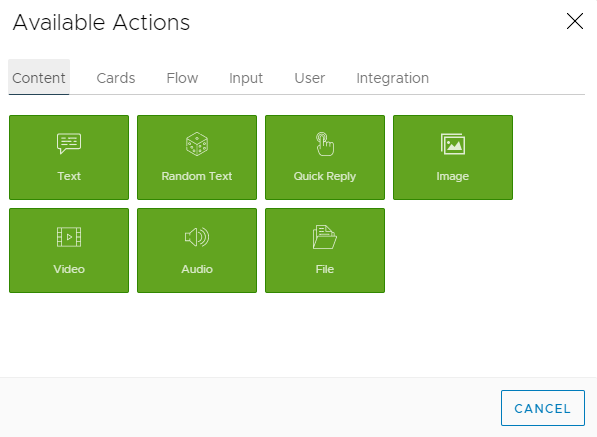
For this first chatbot, we are going to use a Quick Reply button. Move to the “Content” tab of the actions dialog and select “Quick Reply”.
Once the new action has been added to the interaction click it on to display the details.
A Quick button has a button text (that is displayed to the user) and a default Operation that moves the conversation to another flow on the user click.
Operations are smart tech used by Xenioo to heavily personalize each component and we will see a lot more of them in the upcoming lessons.
For now, let’s select the target behavior and interaction in the “Go To Operation”, below the Quick Reply Action data. Select “New Behavior” as behavior and “New Interaction #3” as interaction. Click save to confirm everything
As you see, Xenioo is now displaying an arrow representing the flow connection between the two interactions.
The more complicated your bot becomes, the more this diagram will be fundamental to understanding the chat flow experienced by the user.
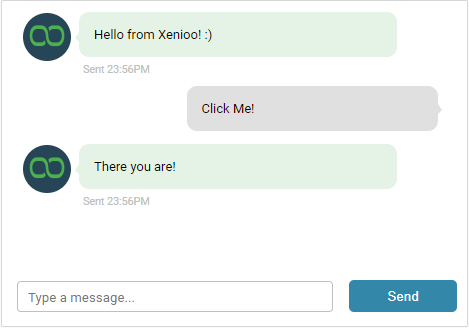
Let’s go back to the preview panel to give a spin to our chatbot.
As you can see now you have a button in your chat: click it and the chat flow will be moved to the new interaction. That’s it!
Wrapping up
In this first lesson we’ve learned the fundamentals of every Xenioo chatbot: Behaviours, Interactions and Actions and we’ve created a very simple chat flow.
In the next
As with all our lessons, you can find the chatbot sample in your Xenioo account so that you can import it to further experiment and learn.